How to Anchor Your Sailboat
How to anchor your sailboat indeed… Easy, right? You have an anchor somewhere on the front of your boat and you drop it a good few meters, let the boat drift back, and feel that reassuring little jerk confirming your anchor is set. Now put the kettle on and relax.
If this is you then you have 2 options. Read on which will mean you lose that blissful feeling that comes with ignorance, or move on and look at boat pictures on the Internet.
Still here? Great! Let’s have a look at anchoring, the gear you need, the skills required, and also look at some of the more advanced anchoring techniques like kedging.
Why do we anchor?
The short answer is to stop our boat from drifting which may be caused by tide, wind, or currents. There are many ways to stop your boat from drifting. For example, a mooring at a marina, a swing buoy, other boats, mooring pylons, etc… However, sometimes you find yourself in a situation where you would like to secure your boat and none of these methods are available. There are 2 options open to you. You can use a sea anchor if you find yourself in very deep water which is described in detail in an earlier article “Storm Drogues and Sea Anchors: To drag or not to drag” or you can use an anchor (colloquially known as a “hook”) in the more conventional meaning of the word.
Main types of anchors
Anchors come in many different shapes, sizes and materials. It is important to get yourself the right anchor for your boat. You can have a look at an earlier article where I talk about anchors in some detail (What is the best anchor for a sailboat) but in essence, there are 4 main anchor designs relevant to modern sailboats.
- The Bruce also known as a “Claw” anchor
- The Delta is known as a “Wing” anchor
- The CQR is best known as a “Plough” anchor, and
- The Danforth or “Fluke” anchor.

These types of anchors come in galvanized steel, stainless steel or even aluminium for smaller models.
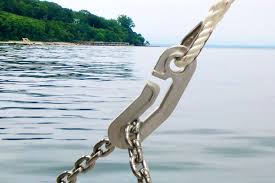
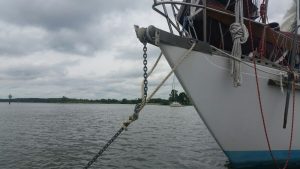
Rode & Chain
It goes without saying that we need to connect our anchor to our boat. This is done using a rode also known simply as an anchor cable and consists of a rope or a chain or a combination of the two.
Rope rode
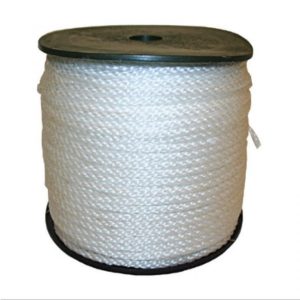 A rode made entirely from rope has limited applications on boats over 25 feet. However, for smaller boats and where the security of the boat is less critical, a rope rode may be the best option as it is lightweight, less voluminous and easier to handle.
The rope usually consists of a 3 or 12-strand nylon line. Nylon is used most frequently because of its elastic qualities so it can absorb sudden loads when anchored. Nylon is also durable and therefore longer lasting.
In my opinion, a rode made out of rope only has no place on a cruising yacht as the rode for your main anchor because it is simply less effective due to the lack of horizontal pull, catenary effect (more on this below…), and the potentially abrasive nature of a seabed. Saying this, a rode made of rope can have secondary applications on a sailing yacht. For example, where you deploy a small stern anchor back to the beach.”

Rope and chain
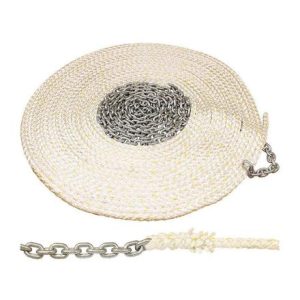 To protect against scuffing and cuts, a short length of chain can be attached to a rope rode. The length of the chain depends on the size of the boat, the conditions it operates in, and the purpose of the vessel. As a general rule of thumb, the chain portion of the rode should be about the same as the length of your boat. A rope-chain rode combination still suffers from potential abrasion.
Furthermore, short lengths of chain may not be long (heavy) enough to keep the horizontal pull on the anchor itself. If the weight is insufficient, the chain will be lifted from the bottom of the seabed and the anchor may be dislodged.
The other issue you encounter with the rope/chain rode combination is where the chain meets the rope. This is okay when the anchor is deployed manually but through a windless, the connecting shackle often doesn’t run through the windless smoothly as it is bulkier than the chain and rope. Splicing your rope may mitigate this issue to some degree.
Chain rode
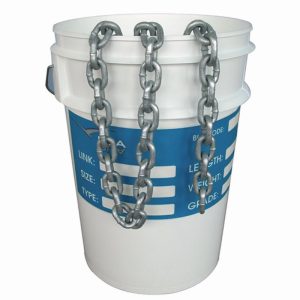 25-foot+ boats, particularly those using a windlass will often opt for an all-chain rode which offers several advantages:
- Shorter rode – At anchor, the length of rode can be reduced because the “length/depth” ratio can be reduced due to the extra weight.
- Security – In high winds, the weight of the chain creates a nice horizontal pull which ensures the anchor digs in.
Disadvantages include:
- Cost – Chain is more expensive.
- Heavy – Chain is heavier and requires a chain locker for easy storage. Because it is heavier, the need for a windlass is almost mandatory. The additional weight also affects the performance of your boat should that be a consideration.
- It offers little elasticity so the use of a snubber will be essential.
Chain and the “Catenary Effect”
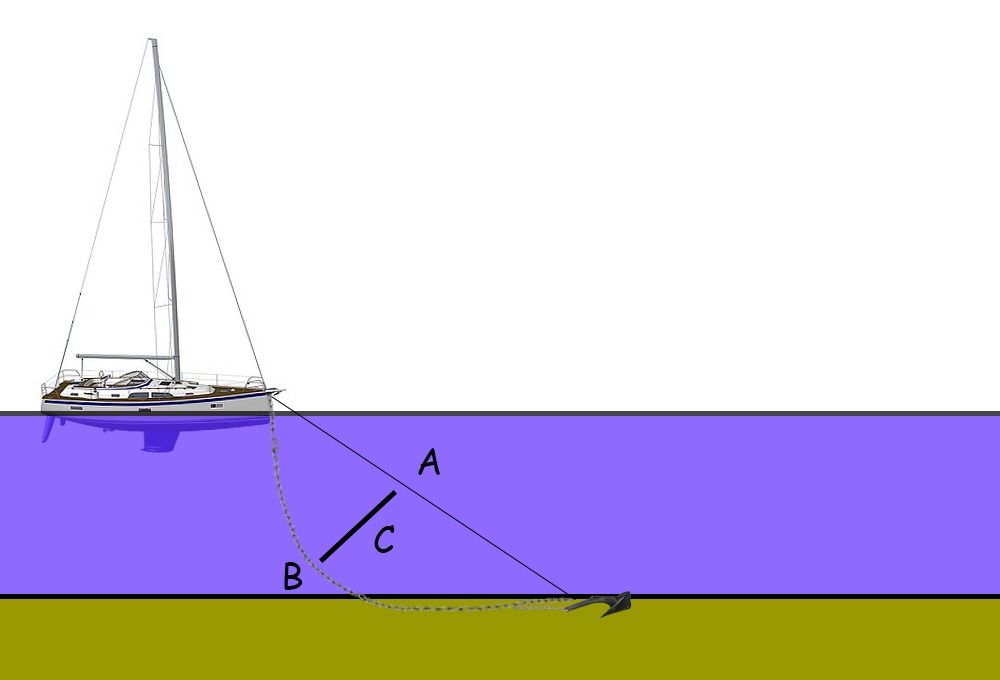
The advantage of a chain is not only its strength and resistance to abrasion but more importantly, its weight which causes the rode to sag substantially. Unexpected loads caused by high wind or heavy swell may want to try to straighten the chain rode which requires a lot of energy. This absorption of energy is referred to as the “catenary effect”.
As the picture illustrates, it would take a fair bit of energy to straighten the rode (B) in line with angle (A) over a distance (C).
However, these jerky forces are still too large for the average windlass so to assist in prolonging the life of your windlass we use a snubber.
To the bitter end…
A lot of modern-day words and expressions are based on maritime terminology. Guess what the original meaning of “to the bitter end” was…
The bitt and the bitter end
The Bitt
A solid post on deck either at the stern or bow of a ship to which anchor, mooring, and towing lines can be attached.
The Bitter End
The end of the rode opposite the anchor which is secured to the bitt.
The snubber
 Both in physics and electronics, the snubber’s function is simply to absorb shocks or spikes respectively.
In essence, a “snubber” is a relatively short length of stretchy line attached to the anchor chain and to a dedicated strong point (or points) on a yacht. The snubber’s role is to negate the load on the windlass as it is not engineered for jerky snatch loads.
In the context of anchoring your sailboat, our snubber is a piece of nylon rope that softens the impact of heavy jolts usually caused by high winds or heavy swell. The stretchy qualities of nylon provide the absorption and the level of absorption is the combination of cordage thickness and length.
It is important to know that a snubber is a consumable and should be inspected regularly and replaced every 2 years with average use. It is also advisable to have a second snubber as a plan “B” or as part of a cradle that runs from both the port and starboard forward cleats.

Chain hooks are easy to deploy but there is nothing wrong with tying a magnus hitch or rolling hitches.
Having 2 tails or a double snubber gives you your plan B should one of the tails fail. Equally important, the double snubber will orientate your boat into the wind better giving you a more comfortable night…
So we have a fair idea now about what we need to have in terms of kit and equipment. But having the tools doesn’t make a tradesman rings as true as having the right anchor doesn’t make a sailor. So let’s start having a look at some of the principles surrounding anchoring your sailboat and some of the techniques available to secure your boat with confidence.
How much rode is enough
When anchoring, one of the questions you will ask yourself is “How much chain is enough chain?”. Luckily, there is a general rule of thumb that can help us out.
As a minimum, this rule demands 5 x the depth you find yourself in. So, if your depth is 10 meters you will need 50 meters of rode.
Depth
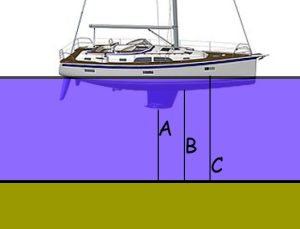 Depth needs to be defined because we often get the depth from our depth instruments which can be calibrated in line with our preferences. As a starting point, it is the transducer that “measures” the distance between it and the seabed. As you can see, the transducer is mounted through the hull (B) and is, therefore, a fair way below the watermark (C).
Personally, I calibrate my depth as a measure of the distance between the lowest part of my boat and the seabed. I do this so I can see without any calculations needed how much water is between me and the bottom. In my case, it is the anchoring that requires a calculation to compensate for my specific depth calibration. Because my draft is 2 meters, I can deduce that if my depth reading is 6 meters, the “real” depth is in fact 8 meters (the reading 6 + my draft 2 + depth 8).

Different interpretations of “depth” in line with your personal celebrations of your depth instruments.
- A = Under keel depth
- B = Transducer depth
- C = True depth
So why is knowing the depth important?

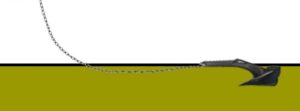 As you can see from the above picture, the angle of the anchor blade is pointing down. This means the harder you pull, the deeper the anchor will dig in. However, this is only possible if the anchor chain exerts a horizontal pulling force on the anchor.

 Conversely, if the angle of the anchor gets over 15 degrees (also known as “critical angle”), the anchor blade starts to point upwards and consequently will dislodge or “break out” when force is applied.
Leave a comment below if you would like to know more about the trigonometry behind this and I will do my best to explain it. For the rest of us, we can say that due to the anchor design and the angles involved, a ratio of 5:1 is required as a minimum safe rode length. That is 5 meters of chain for each meter of true depth. For example, if you find yourself in 5 meters of water, you deploy a minimum of 25 meters of chain.
“Here you go again making a really simple rule of thumb more complex”; cheers, my pleasure…
Other things to consider when estimating chain length
The tide
As we all know, depth and time are inherently linked by tidal movements. This means that your “current” depth may not be the same depth you experience in 6 hours. For example, the highest tides in Australia and the second highest in the world occur near Derby in Western Australia. The tides rise to almost 12 meters and drop to about 1.5 meters at low tide. BTW, the smallest tides in the world occur in the Mediterranean where the difference between low and high tide reaches an astonishing 2-3 cm.
So how does this relate to anchoring? Well, logically, the minimum amount of chain you deploy has depth as a major input as it is the “1” in the 5:1 ratio. So you need to make your calculations based on the worst-case scenario or in other words your deepest tidal depth. Make sure you know what the tide is doing well before you reach your destination so you are ready to determine the depth at the highest point.
The wind
I did mention “minimum requirements” with our 5:1 ratio. We can apply this ratio in calm weather. When the wind picks up, so does our need to keep the boat securely anchored. When it gets a bit blowy, I would adjust our ratio from 5:1 to 7:1. So for example, in 5 meters of water, we now put out 35 meters of chain.
The fudge factor
So before we start talking about anchoring techniques, we need to add the proverbial fudge factor. It is the difference between working with theoretical tolerances and simply adding a safety margin. Personally, I like the idea of adding the length of the boat to the equation which does two things. First, it creates that little security margin that gives you that warm and fuzzy feeling before you go to sleep at night. Secondly, it is a variable that is proportionate to the situation because smaller boats require proportionately less chain compared to larger boats.
Final chain length challenge
You are anchoring your 12-meter sailboat and you find yourself with 3 meters of water under your keel (true depth is 5 meters). It is a very windy day and the tide is expected to rise another 1.5 meters. How much anchor chain would you deploy?
Answer: 61 meters of chain
We use the true depth which in this case is 5 meters but add the expected tidal rise of 2 meters. This brings the maximum true depth to 7 meters (5 + 2). We then multiply this by 7 because of the windy conditions. Ie, 7 x 7 = 49 meters. We then add our fudge factor of 12 which is the length of the bout. Ie, 49 + 12 = 61 meters.
Anchoring Techniques
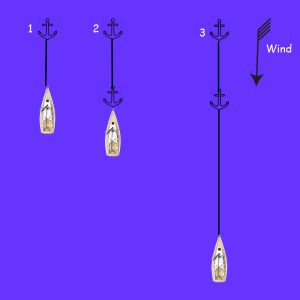
Standard Anchoring Method
Under conditions where the wind and swell (if any) are coming from the same direction, a standard anchoring method can be adopted.
- After driving the boat into the wind to the desired location we drop the anchor until it reaches the seabed.
- We then let the boat drift back or gently motor back whilst letting out the desired amount of chain.
- When we reach the desired amount of chain we lock the windlass and let the anchor set.
Post anchoring should include deploying a snubber to alleviate any forces on the windlass. It is also recommended to set an anchor alarm either as part of your boat’s electronics or on a phone or tablet.
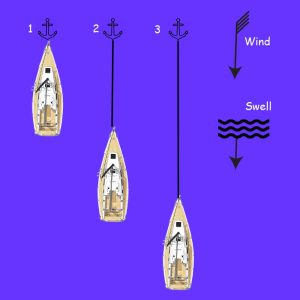
Standard Anchoring Method
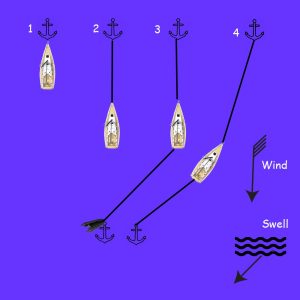
Bridle Assist Anchoring Method
Where the wind and swell are not coming from the same direction, you can adopt a bridle-assisted anchoring method.
- Drop the anchor as previously explained.
- Let the boat drift back or gently motor back whilst letting out chain to the point where you have 10 meters of chain to feed out. Tie a line to the chain using a magnus hitch or rolling hitches.
- When the desired amount of chain is out we lock the windlass and let the anchor set, apply the snubber, and start winching in our line until we reach an angle where the boat is orientated perpendicular to the swell.
Carry out the usual post-anchoring tasks as normal…

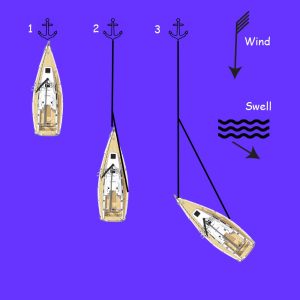
Bridle Assist Anchoring Method
“Stern to” Mooring / Anchoring Method
In several places around the world, space at the wharf is of a premium. Although the stern is tied up to the wharf, the bow of the boat is still anchored. “Stern to” is also known as “Med Mooring” (Mediterranean).
- Drop the anchor at a minimum distance.
- Gently motor back whilst letting out chain to the point where your stern is very close to the wharf.
- Tie off and adjust the tension on the windlass
Carry out the usual post-anchoring tasks as normal…

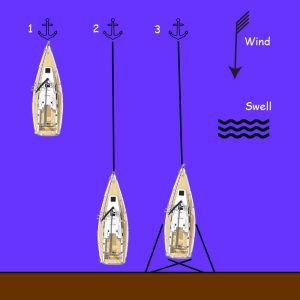
Stern To or Med Mooring
Bahamian Anchoring Method
There may be situations where you find yourself in a place where the tidal current is the main driver for determining your anchoring method. The Bahamian Anchoring Method could be a solution and requires 2 anchors which are both deployed from the bow.
- Drop the anchor at the forwardmost extremity of your anchoring position.
- Gently motor back whilst letting out chain to the point where you reach the other extremity of your anchoring position. You drop your second anchor there from your bow.
- Move forward retrieving your first anchor chain at the same rate as you let out your second anchor chain until you reach the middle of your anchoring position.
- Your boat will swing in accordance with the current rather than the wind.
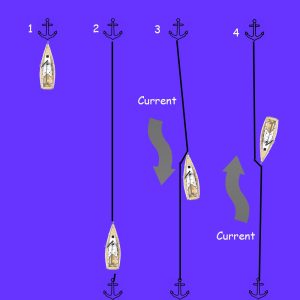
Bahamian Anchoring Method
Stern Anchoring Method
When wind and swell do not sync, the stern anchor method can be used. Like the bridle assist anchoring method, it will orientate your boat more into the swell providing a more comfortable anchorage.
- Drop your main anchor as usual.
- Gently motor back whilst letting out chain to the point where you reach your anchoring position.
- Deploy a secondary anchor with your tender perpendicular to the swell.
- Tension the secondary anchor rode appropriately so that the boat points into the swell.
Stern Anchoring Method
Parallel Secondary Bow Anchoring Method
Where the conditions are adverse you may want to consider a secondary anchor off the bow. The two anchors can be about a boat length apart creating a strong hold.
- Drop your main anchor as usual.
- Gently motor laterally whilst letting out the main rode to the point where you reach your secondary anchor point.
- Deploy a secondary anchor and drift backward controlling both the main and secondary rode until you reach your anchoring position.

Parallel Secondary Bow Anchoring Method
Series Secondary Bow Anchoring Method
In some situations, you may want to double up on anchors but there is no room for deploying a secondary rode and anchor. In this case, you may want to consider using the same method as above but deploy the anchors in series.
- Drop your first anchor as usual.
- Gently motor backward whilst letting out a short rode which is attached to the crown of your second anchor.
- Deploy a secondary anchor and drift further backward until you reach your anchoring position.
Ensure the distance between your two anchor points is twice the high tide depth so when breaking out your last anchor, the first is already dealt with.
Series Secondary Bow Anchoring Method
A quick word about Kedging
Kedging is also known as warping and in essence, it is a method of moving your boat where other options such as sailing or motoring have failed. For example, you may find yourself at a lee shore and the motor will not start. Kedging could save the day.
Kedging is an alternative way of moving a boat when both sail and engine propulsion are not available. You will need a kedge which is a small light anchor. The kedge is dropped towards the direction you want to move the boat utilizing your tender. After the kedge sets, you can pull your boat towards it.
Kedging or warping is a technique to move your boat out of sticky situations where other propulsion methods fail.
- Recognize the need for kedging early rather than later.
- Prepare your kedge anchor and as much lite rode as you can muster and deploy the anchor as far in the direction as the rode will take you.
- After returning to your boat, start hauling in the anchor as it will move your boat out of danger.
- When the kedge breaks out repeat the process until you are clear and out of danger.
Note that you can achieve the same in deeper water with a sea anchor. You can read more about sea anchors here.
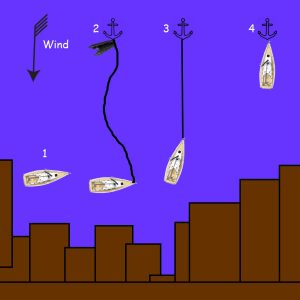
Kedging or Warping
Anchor Alarms
Using an App
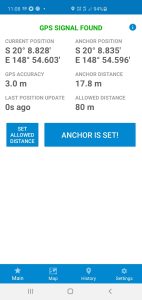 When on anchor it is extremely important to know when your boat is drifting. There are several ways to keep yourself up-to-date on your boat’s position. From shooting back-bearings to shore and triangulating your position to simply locking your position into an App.
I have an anchor alarm on my onboard Raymarine system but I seldom use it. I prefer using “Anchor Watch Lite” which is a free Android App that does most of what I need it to do. It lives next to my head at night so I can deal with alarms quickly.
In fact, I purchased the “pro” version of this App for about $9 but it offers a level of complexity I can normally do without. However, the main advantage of the pro version is that you can be notified of any alarms when you are onshore and where both your boat and you are within phone reception.
You can find it here: Anchor Watch Android
Supplementing your anchor alarm
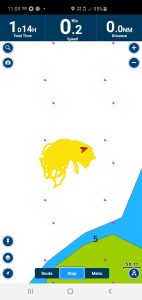 In addition to using an anchor alarm App, I also have a copy of Navionics on the same phone. After I anchor and set the alarm, I simply start a new route. The route will show the movement of the boat over time. You can quickly deduct if the boat follows the same anchorage pattern or starts to drift out of it well before any alarm goes off.
There is no alarm function set on this but I normally keep my phone on and open on this application so when I “wake” during the night, a quick dozy squint at the phone will reassure me that we are okay.
Using the phone also negates having all the instruments on during the night which preserves power. In any case, I’m curious to find out how you deal with anchor alarms: leave a comment…
That is clearly enough waffle about how to anchor your boat. If you feel that there is any erroneous content then please let me know by commenting below. If you feel there is any critical information missing that should be included then please also let me know. Or just add a comment below to say hello…
1 thought on “How to anchor your sailboat securely”
Pingback: Tides and Currents on Charts - Tall Tell Tales